
What is a class diagram, and what is it used for?
A UML (Unified Modeling Language) class diagram illustrates the structure of a system by describing the classes, their attributes, methods, and relationships between objects.
Learn more about UML and its diagram types.
For a deeper understanding, let's first recall what a class is.
A class is a template for creating objects that provides initial state values: initializing fields` variables and implementing the behavior of fields and methods. In other words, a class describes what an object can be. A class represents a concept that describes state (attributes) and behavior (methods).
In UML diagrams, there are most often these six types of relationships between classes:
Association. Similar to relationships that connect objects, associations connect classes. Assuming we have two classes that interact, there must be a continuous connecting line between them, denoting an association in the diagram. Often we can also see a verb conveying its meaning. In addition, we can also specify the multiplicity, that is, the number of objects that can take part in the relationship.
Inheritance. This is a schematic representation of the relationship between a parent class and its descendants.
Implementation. It usually refers to the relationship between an interface and the objects that implement it.
Dependency. An object of one class can use an object of another class in its method. If the object is not stored in a class field, this type of interclass relationship is modeled as a dependency. Dependency is a special case of the association of two classes, wherein changes in one class will inevitably lead to changes in the other.
Aggregation. A special type of association between classes, wherein one class is part of another.
Composition. Essentially a kind of aggregation, only, in this case, classes that are part of another class are destroyed when the aggregator class is destroyed. Find out how Composition differs from Aggregation.
Check out our article on UML Class diagram arrows.
Online shopping system and its components
In general terms, an online shopping system is a platform on which you can buy products online. Consequently, there are two parties — sellers and buyers — as well as the object of sale, i.e., product (or items).
It is also worth bearing in mind that the product is bought and sold for money, which leads to the payment process. In addition, since we are talking about online commerce, the shipping process is set up separately.
The purchase and delivery of a product in an online shopping system are usually arranged as one order attached to the buyer.
Make your own UML class diagram with Gleek.
Let's now translate all this into UML language to understand what classes we need:
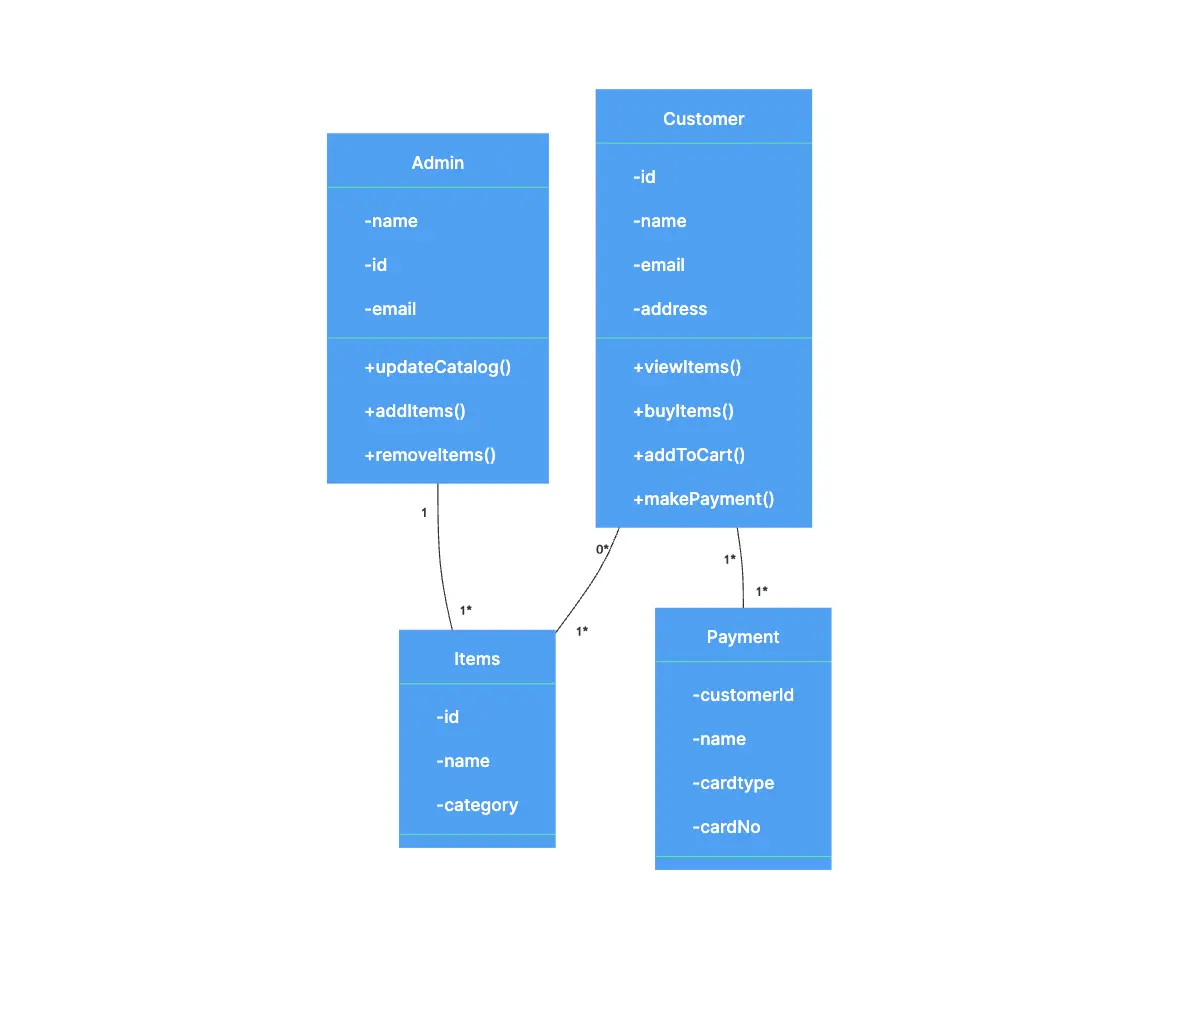
Admin. An admin (seller) has an id, a name, and an email address. He can add and remove items to and from the catalog.
Customer. A customer (buyer) also has an id, a name, and an e-mail address, but also it is important here to give the address where the delivery will take place. The customer can see the items, add them to the cart, and buy and pay.
Items. Items (products) have an id, name, and category they belong to.
Payment. This class has the id of the customer who pays, the name, and the number and type of the card.
Order. This class has the order id and number, order date and creation date, current order status, and customer name.
Shipping info. A shipment has an id, type, and address. The critical point is that this information must be updatable.
Read Gleek's tutorials on How to create an ATM system and Restaurant management system with a class diagram.
Step-by-step guide on how to create a UML class diagram for online shopping in Gleek
To create a UML class diagram in Gleek, you need to:
Add classes;
Define relationships between classes.
Let’s start with adding the classes we described above.
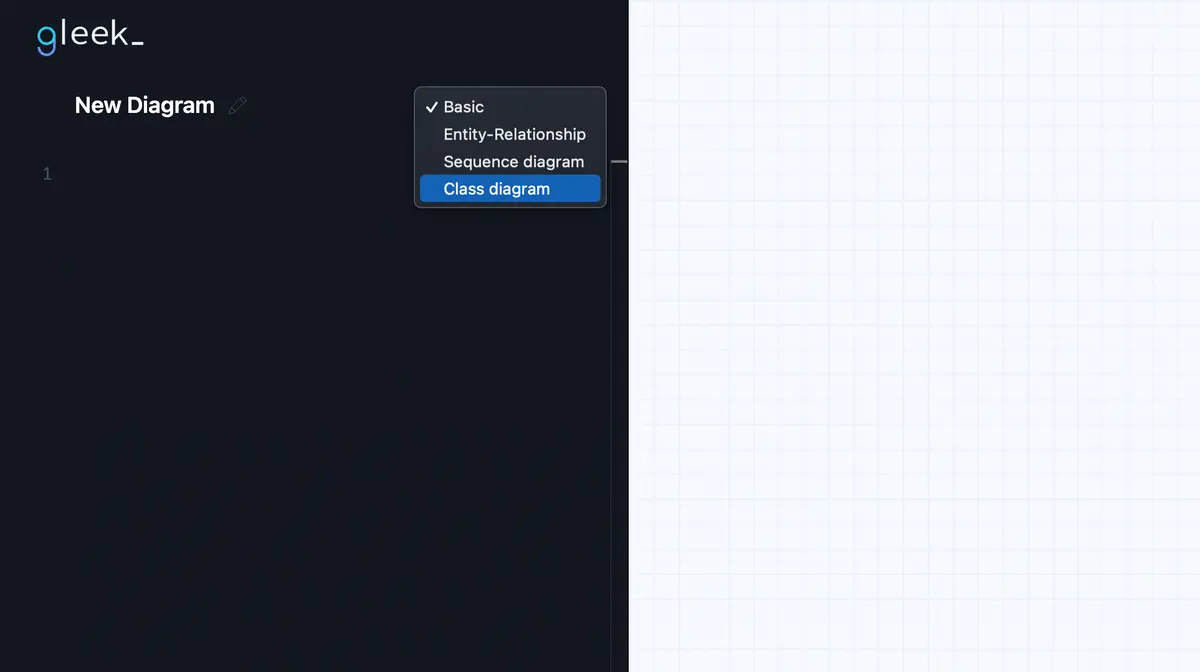
Open app.gleek.io and click on “New Diagram”. Choose “Class diagram” in the list.
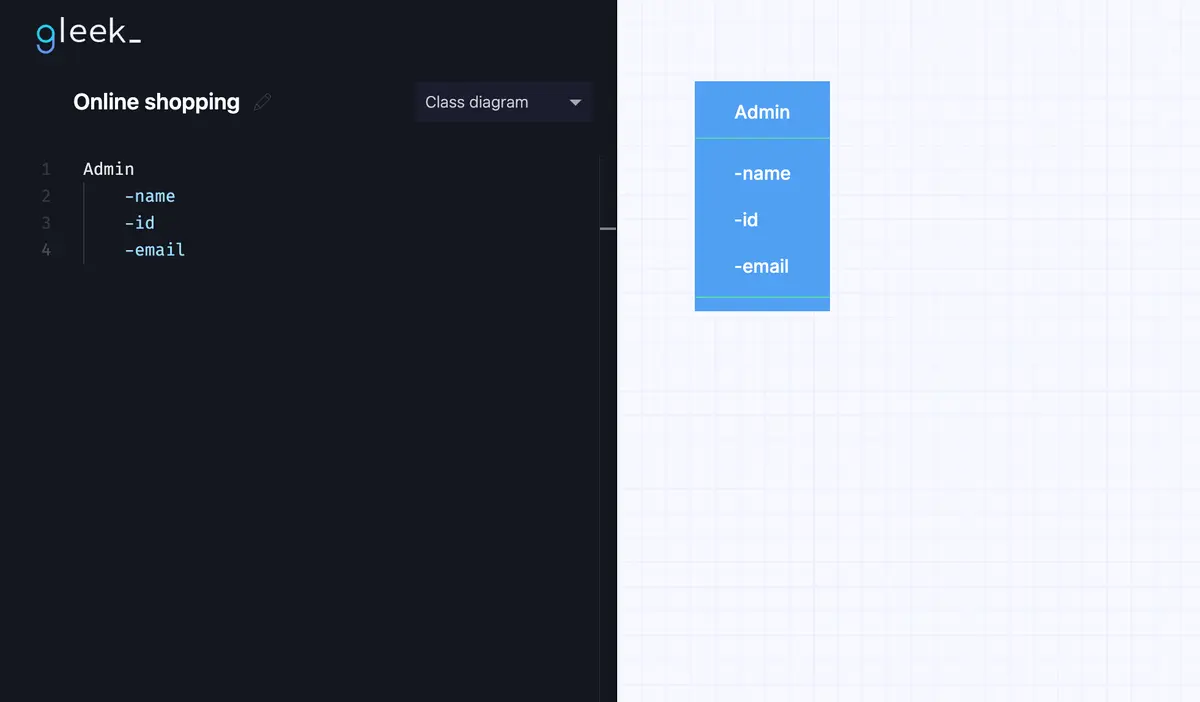
Now we can start adding the first class, “Admin”. Just capitalize the class name, and it will immediately appear on the chart.
Next, you must add class attributes: “id”, “name”, and “email”. To add an attribute, go to a new line, press “Tab”, and write the attribute name.
Important! Once you have pressed “Tab” in the previous line, you no longer need to press it when you go to the next line. And if you have already added all the abstracts and now want to create a new class, just press “Delete”.
The result will be a class like this:
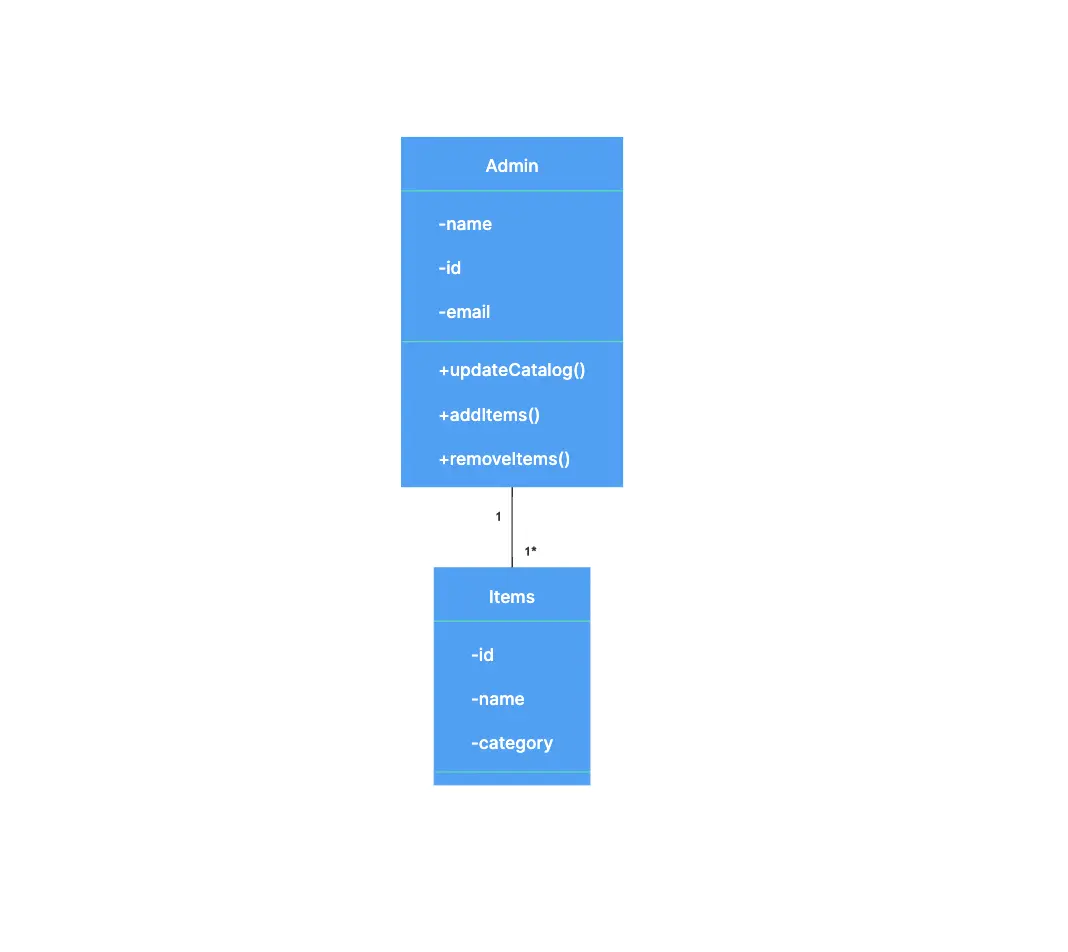
Not only does the “Admin” class exist, but it can also do something like removing items. That's why we need to add methods to it.
To add a method, you also need to press “Tab”, then write the name of the method and add at the end “()”.
Let's write in “Admin” class methods “updateCatalog()”, “addItems()” and “removeItems()” and get the following scheme:

Then, let’s add the other classes in the same way.
As we’ve mentioned before, besides “Admin” we need the class “Items” with attributes “id”, “name” and “category”. “Admin” and “Items” are connected since “Admin” can delete and add “Items”. In Gleek syntax, it will look like this:
"Admin--Items"
When you will write this code, you’ll see that the connection appears as a line between those two classes.
But we also need to specify that one “Admin” can do all these actions we’ve described as methods with one or more “Items”. In Gleek syntax, it will look like that:
“Admin{1}--{1*}Items”
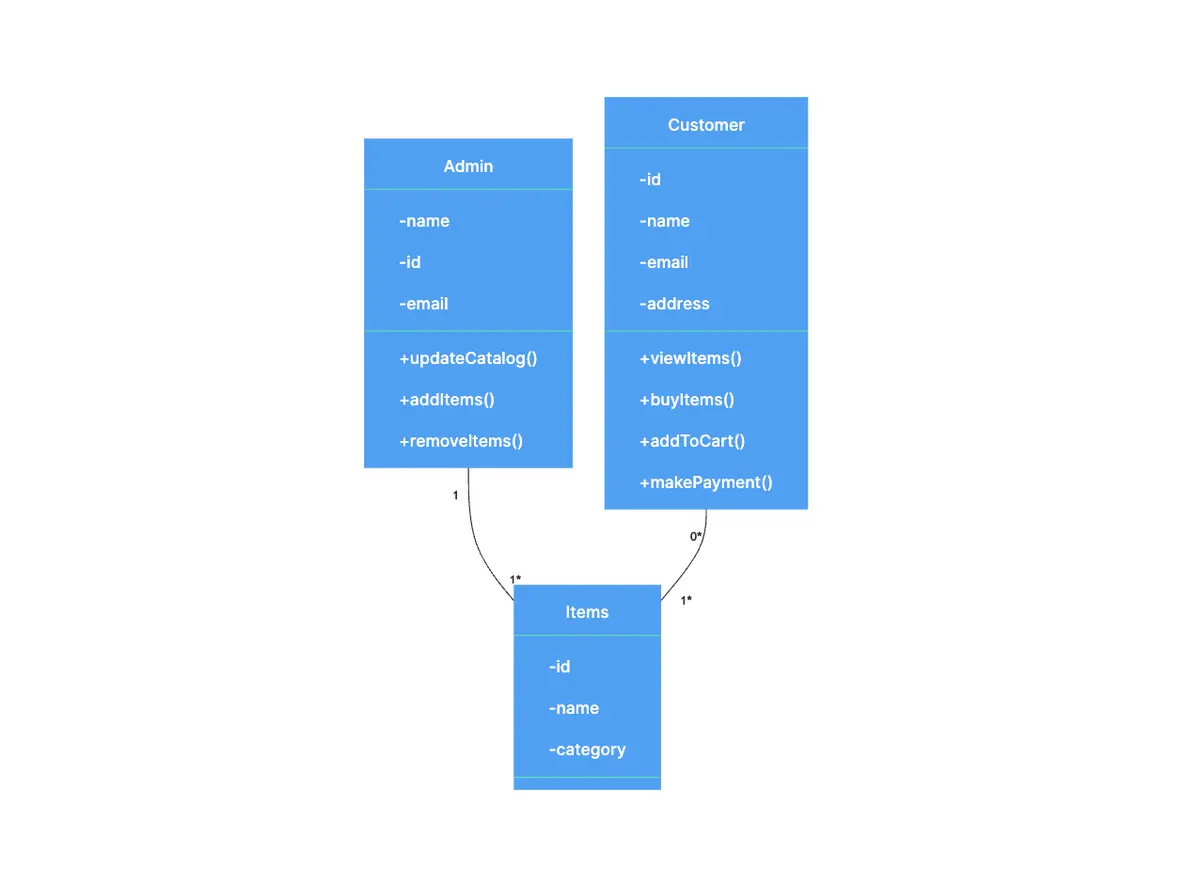
The next class we need to describe is “Customer”. It has “id” and “name” too, as well as “email” and “address”. But besides attributes, “Customer” has methods to be able to “viewItems()”, “buyItems()”, add them to the card, and “makePayment()”.
Find out on How Class Diagrams Are Evolving in Modern Software Engineering.
As you may already guess, that is because “Customer” is connected with “Items” too. Let’s write this connection as code in Gleek:
“Customer{0}--{1}Items”
Perfect. Now, because “Customer” can “makePayment”, we need to add the “Payment” class with a few attributes like “customerId” and “name”, and describe the connection between “Customer” and “Payment”. Like this:
“Customer{1}--{1}Payment”
Almost done! Now only two classes are left to be added: “Order” and “Shipping info”. “Order” is a simple class that has only attributes like “orderId”, “orderNo” and “orderStatus”. At the same time, “Shipping info” has a few attributes like “shippingId”, type and address, plus one method “updateShippingInfo()”.
The “Order” class has connections both with “Customer” (because “Customer” creates “Order”) and “Shipping info”. That’s also understandable since every “Order” should have “Shipping info”. The code in Gleek will be like this:
“Customer{1}--{1}Order”
“Order{1}--{1}Shipping info”
We could work with the scheme we’ve got, but let's also prescribe which attributes and methods are private and which are public.
In Gleek, to specify that an attribute or method is private, you need to put “-” in front of its name, and to indicate public, you need to write “+”. In our scheme, all attributes will be private, and all methods will be public.
Make your own UML class diagram with Gleek.
We add those symbols to the code and here's how a ready-made class diagram for an online shopping system would look:
Pretty easy to do and looks fantastic, isn’t it? See our other tutorials and materials to become a guru in Gleek, create unique diagrams for online shopping and other systems, and add more classes and more connections whenever you or your client need them. Want to try something new? Have a look at a fresh step-by-step article for the University management system, where we used Gleek's AI chat!
Related posts
University management system class diagram with Gleek AI chat
UML class diagram arrow types: explanations and examples
Hospital management system class diagram using Gleek App
How do we create a Class diagram for a Library Management system?
UML relationships explained: Dependency, Realization, Association
UML diagram types: everything you need to know